How to make the best use of Google Analytics as a Web Developer
Google Analytics is an invaluable tool if you are a web developer, blogger or if you simply own a website. Few other tools come close to the volume of information offered by Google Analytics. Besides it is also free of charge which certainly adds to its popularity. However utilizing this huge amount of data offered by Google Analytics is a challenge and if done carefully, the data can be converted into intelligence that alerts you to possibilites of increasing the effectiveness of your website and makes sure that it reaches out t the right audience. In this tutorial, we are going to show you how to make the best use of Google analytics from a web developers perspective.
What is Google Analytics?
Google, in its attempt to help you make the best out of your website, offers you state-of-the-art monitoring and analytics services for your websites, free of cost, under the banner Google Analytics.
Google Analytics - What is it for? Why do you need it?
To increase the traffic to your website, you should first know what makes people come to your website, how they come to you, and what you can do to improve it. Further, you need to know how these visitors interact with your site, and what you can do to make them stay longer and keep coming back. A clear knowledge of such basic factors helps you make intelligent decisions regarding your site’s business.
What does Google Analytics’ offerings look like?
Here’s a quick screenshot of what the basic Google Analytics Dashboard offers you:
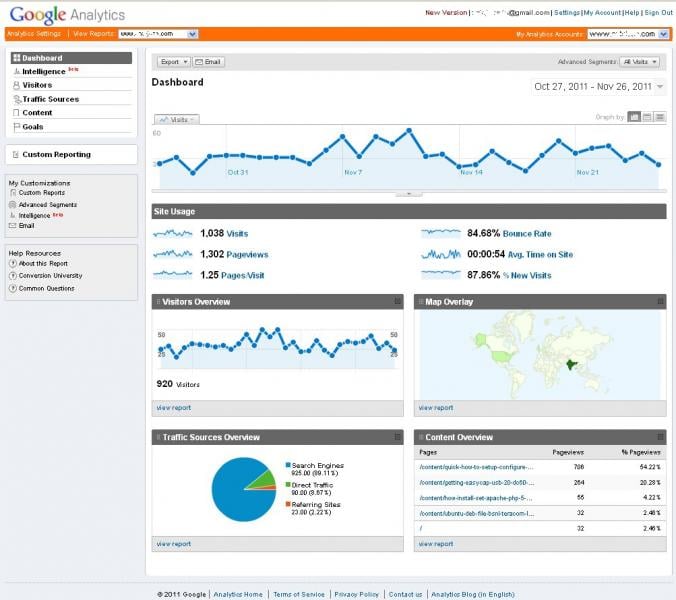
Google Analytics by default provides you valuable insights on
- number of visits
- number of pageviews
- bounce rate
- visitor demographics
- traffic sources
How GoogleAnalytics works
The following block diagram represents the process flow that takes place:
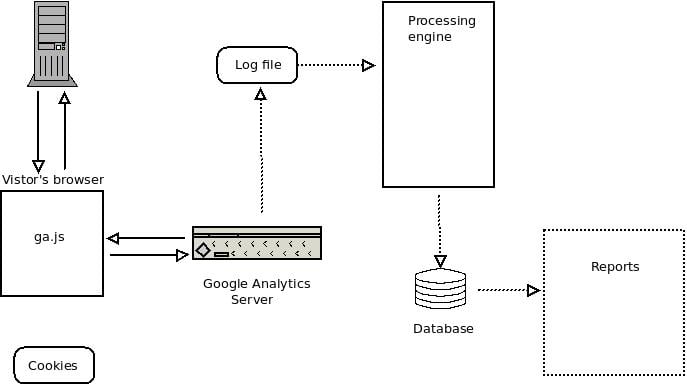
Google Analytics requires you to add a small piece of Javascript code (called the Google Analytics Tracking Code) to your site’s pages.
The data collection process begins when a visitor’s web browser requests a page from the webserver. The server responds by sending the requested page back to the browser. When the visitor’s browser starts to execure the Tracking Code present in the webpage source, the script identifies various attributes regarding the visitor and the browsing environment, such as time spent on the site, where the user is from (location), etc.
While the data is being collected, the browser actively and asynchronously downloads a script by the name ga.js from the geo-loadbalanced servers of Google. Once the ga.js script has been fully downloaded and starts executing, the collected data is sent to Google’s servers. The server stores the received data into a temporary log file. These log files are processed at regular intervals (of approximately 3 hours), and the processed data is available as reports in 24 hours.
Advanced Google Analytics Features - Event Tracking and Custom Variables
The event tracking feature of Google Analytics allows you to track events (also called “actions” or “conversions”) on your website. An action occurs when a visitor clicks on something, perhaps a PDF white paper download. The event tracking code is a basic line of JavaScript that you add to a hyperlink. The tracking code should look something like this:
_trackEvent(category, action, opt_label, opt_value, opt_noninteraction)
Parameters:
- category (required) : The name you supply for the group of objects you want to track.
- action (required) : A string that is uniquely paired with each category, and commonly used to define the type of user interaction for the web object.
- label (optional) : An optional string to provide additional dimensions to the event data.
- value (optional) : An integer that you can use to provide numerical data about the user event.
- non-interaction (optional) : A boolean that when set to true, indicates that the event hit will not be used in bounce-rate calculation.
Eg: Play
Custom Reports in Google Analytics using Custom Variables
Google Analytics allows custom data monitoring and reporting by allowing you to play with Custom Variables. This allows us to monitor custom data such as tracking popular authors on your site, which does not otherwise come under the default set of reports in Google Analytics.
Each custom variable basically has a name-value pair. The full declaration structure may have:
- Name
- Value
- Slot or index - to organize our custom variables, ranging 1 through 5
- Scope - 3 levels - page, visitor, visit
Google Analytics primarily deals with three levels of scope:
- Page Level - persists as long as the visitor is viewing a particular page.
- Visitor Level - persists on the visitor’s browser as a cookie, for 24 months or till the cookie gets deleted.
- Visit Level - persists for an entire visit session.
Scope and Index work in tandem to decide how many custom variables you have available at any given time.
How to implement a new Google Analytics Custom Variable
The first step is to write a line of _gaq.push command for the same.
The next step is to place this in your page source according to your tracking requirement.
The standard asynchronous javascript code snippet for implementing custom variables in Google Analytics is of the following syntax:
_gaq.push(‘_setCustomVar’, index, ‘name’, ‘value’, scope);
where
index is a number from 1 through 5,
scope is a number from 1 through 3,
{1=>visitor, 2=>visit, 3=>page},
name, value are just plain text.
_gaq.push makes sure that all what you enter in this command gets pulled into Google Analytics.
Now that you have this part done, where do you place this code?
The following example cases would illustrate this good:
You may want to categorize all of the pages on your site using a page level custom variable. In this case you might place the custom var code in the standard GA code snippet, like this:
//<![CDATA[
var _gaq = _gaq || [];
_gaq.push(['_setAccount', 'UA-XXXXXX-1']);
_gaq.push(['_setCustomVar',1,'PageCategory','Sports', 3]);
_gaq.push(['_trackPageview']);
(function() {
var ga = document.createElement('script');
ga.type = 'text/javascript';
ga.async = true;
ga.src = ('https:'== document.location.protocol ? 'https://ssl' : 'http://www') + '.google-analytics.com/ga.js';
var s = document.getElementsByTagName('script')[0];
s.parentNode.insertBefore(ga, s);
})();
// ]]>
Or, if you’re going to identify someone as a ‘member’ of your site, you might place the code on a page after the visitor logs in. Like this:
//<![CDATA[
var _gaq = _gaq || [];
_gaq.push(['_setAccount', 'UA-XXXXXX-1']);
_gaq.push(['_setCustomVar',1,'VisitorType','Member', 1]);
_gaq.push(['_trackPageview']);
(function() {
var ga = document.createElement('script');
ga.type = 'text/javascript';
ga.async = true;
ga.src = ('https:' == document.location.protocol ? 'https://ssl' : 'http://www') + '.google-analytics.com/ga.js';
var s = document.getElementsByTagName('script')[0];
s.parentNode.insertBefore(ga, s);
})();
// ]]>
These should give you a pretty good headstart on making the best out of Google Analytics.