Configuring TCP/IP Properties on your Windows PC with BSNL connection
BSNL is the largest provider of broadband connections in India. With a large network of optical fibre cable spanning across the country, BSNL now have footprint in every nook and corner of India. BSNL is also famous for providing flexible and quality plans for masses at cheapest rates. Types of Modem's provided by BSNL depends largely on the plans they offer.
Configuring TCP/IP Properties for BSNL in Windows9X and Windows XP/2000 is slightly different. Following post will give the exact details on how to configure TCP/IP properties in Windows9X and Windows XP/2000 with screenshots.
Connect PC to CPE using LAN /USB cable and power on the CPE and PC both.
Ensure that LAN/USB Link LED on CPE is glowing and in stable condition.
TCP/IP settings for Win9X.
1. Go to Start-> Settings-> Control Panel-> Network to open the Network Control
Panel.
2. Click on Configuration tab and search for the line containing TCP/IP. If more
than one adapter is installed, then look for the line TCP/IP -> ( Ethernet/USB
adapter name ). Select the line and click on properties.

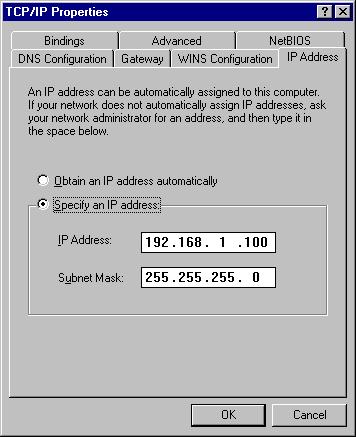
3. Go to the IP Address tab and Check Specify an IP address and enter the IP
address 192.168.1.100 and subnet mask 255.255.255.0
4. Go to Gateway tab and enter the gateway IP address 192.168.1.1
5. Go to the DNS configuration tab and enter Primery DNS as 192.168.1.1 and
secondary DNS as 61.1.96.71.
6. Click OK and restart the PC.
TCP/IP settings for Win XP/ 2000
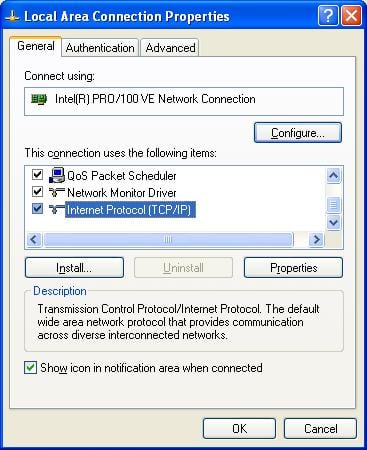
1. Double click on Local Area Connection and select Properties.
2. Select ‘Internet Protocol(TCP/IP)’ and click on Properties.
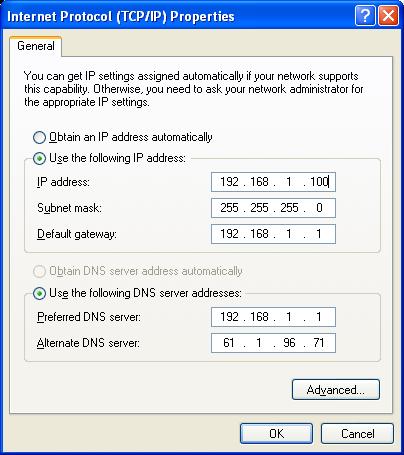
3. Select ‘Use following IP address’and enter IP address 192.168.1.100, subnet
mask 255.255.255.0, Default gatway 192.168.1.1, Preferred DNS 192.168.1.1 and
Alternate DNS as 61.1.96.71.
4. Click OK.