How to customize and display file upload button for a Contact Form 7 plugin using CSS and jQuery
While working on a wordpress site I came across a problem to customize the file upload button in Contact Form 7 plugin. I tried a few tweaks using CSS to customize the button but no luck. Later I found a trick using CSS and jQuery which is explained below. In my previous article "How to display location of an user in a mail send using Contact Form 7 plugin by passing the IP address in a Wordpress Site?", I have explained about Contact Form 7 plugin.
Problems I faced using file upload buttons are not able to customize the design as required and for different browsers file upload button is displaying differently. So what I did is, generated a File Upload Button, Textfield and a Button for the contact form. In-order to get this goto path 'wp-admin/admin.php?page=wpcf7'. Here in Form section on right side you could see a dropdown menu named "Generate Tag". In this select required fields.
1. File Upload
When you select a file upload, following code will be generated place this in your form
[file file-265]
Here I have added an ID, Class, What type of files to be uploaded and Size
[file file-265 id:fileuploadfield class:fileuploadfield limit:120000 filetypes:.doc 1/]
Add the following code in File Attachments in mail part so that uploaded file will be attached along with the mail.
[file-672]
2. Text Field
Now generate a text field and add an ID and class for it.
[text uploadtextfield id:uploadtextfield class:uploadtextfield]
3. Button
Enter the following code to display a button.
<input type="button" id="uploadbrowsebutton" value="Browse">
Its better to give this in a div, for feasibility.
  <div class="uploadfieldtrick">
    Upload Resume:
    [file file-265 id:fileuploadfield class:fileuploadfield limit:120000 filetypes:.doc 1/]
    [text uploadtextfield id:uploadtextfield class:uploadtextfield]
    <input type="button" id="uploadbrowsebutton" value="Browse">
  </div>
Now using css I have hidden the fileupload button and customized the text field and button as per requirement. See the code below.
#sideUpload #fileuploadfield {
    display:none;
}

#sideUpload #uploadtextfield {
  height:18px;
  width:139px;
}

#sideUpload #uploadbrowsebutton {
  height:27px;
  width:147px;
  margin-top:5px;
  text-align:center;
}
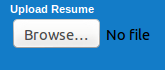
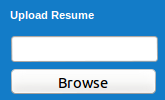
See the two images below, which shows how the file upload button looked before and after
Now to get the functionality of the file upload button for the text field and button, i.e, when the fields are clicked they should perform as file upload button. In-order to implement this functionality we used jQuery.
(function($) {
  /*Brought click function of fileupload button when text field is clicked*/
	$("#uploadtextfield").click(function() {
		$('#fileuploadfield').click()
	});

  /*Brought click function of fileupload button when browse button is clicked*/
	$("#uploadbrowsebutton").click(function() {
		$('#fileuploadfield').click()
	});

  /*To bring the selected file value in text field*/
	$('#fileuploadfield').change(function() {
    $('#uploadtextfield').val($(this).val());
  });

})(jQuery);
In jQuery "To bring the selected file value in text field", here in file upload button when we select a file there is a change in id for the button, in that changed id only the selected file details are stored. So to get the corresponding details we used the following code.
  /*To bring the selected file value in text field*/
	$('#fileuploadfield').change(function() {
    $('#uploadtextfield').val($(this).val());
  });
Hope you find this article help full. Contact Us via comment box below regarding any doubts and sugggestions regarding this article.